如何使用 Python 和 Locust 進行 Load testing 入門教學
前言
身為一個開發者在開發完 Web 應用程式時往往會需要透過 Load testing 和 Profiling 評估目前系統的性能和是否需要繼續優化和估算所需的運營的成本並了解系統的性能邊界,以建立高可用、高穩定性的網路服務。目前市面上有許多可以用來進行 Load testing 的工具,例如老牌的 Jemeter、LoadRunner、Apache Bench(ab)、wrk 等。若是你想找一個可以不用操作複雜的 UI/XML 和可以使用 Python 語法撰寫操作 script 的話,Locust 是一個不錯的選擇。接下來將簡單介紹一下 Locust 的使用方式。
Locust 簡介
Locust 本意是蝗蟲的意思,其實仔細想想,當大量的使用者進到你的網路服務時真的就像是蝗蟲入侵一樣,確實是一個貼切的工具名稱。
Locust 的主要特色在於使用上方便簡單:
- 透過 Plain Python Code 定義使用者操作行為,不用使用 XML 或複雜的 UI 進行操作
- 支援分散式模式,模擬百萬使用者操作
- 許多知名服務已有相關使用經驗:Battlefield(戰地風雲)
一般我們在進行 Load testing 時會比較注意的是 Response Time 和 Throughput 的表現。在 Locust 中會提供 RPS(Request Per Second,一般等同於 QPS,RPS = Request count / Response Time)和 Response time(clent 發出請求到 server 返回時間)和 Error rate 等統計數據和圖表可以參考,雖然簡單但也算蠻夠使用。
環境建置
安裝 Locust 最簡單的方式是使用 pip 安裝,先確認本身已有 Python 和 pip 環境(建議可以使用 Python3.4 以上),然後在 terminal 執行以下指令:
1 | $ pip install locustio |
由於 Locust 不是使用 process 和 thread 而是 gevent 提供的 coroutine 和 non-block IO 來實現網路 concurrent request(併發請求)。因此使用單台機器理論上也可以產生數千的 concurrent request,若是搭配分散式模式則可以支援更高的併發請求。
若是 mac 使用者可能會需要安裝 libev 來支援 gevent 使用:
1 | $ brew install libev |
更多安裝和環境建制可以參考官方網站
撰寫第一個 Locustfile
完成了環境設定後,接下來我們就可以來撰寫 Locustfile 來定義我們要模擬的使用者行為。以下是一個簡單範例(locustfile.py):
一般來說 Locustfile 會有兩個主要的 Class 組成(WebsiteTasks、WebsiteUser),其中 WebsiteTasks 繼承 TaskSet 而 WebsiteUser 繼承 HttpLocust(HttpLocust 繼承 Locust)。所以可以看成 Locustfile 主要為 Locust 和 TaskSet 兩大 Class 所描述。由 TaskSet 定義 Locust 這群產生出來的蝗蟲要怎麼行動。
1 | from locust import HttpLocust, TaskSet, task |
我們在上面的檔案可以看到 WebsiteTasks 裡面定義了 on_start 為每次 WebsiteUser 開始任務需要執行的步驟(on_stop 為結束),上面是先進行 post 請求登入,接著我們可以看到 @task 這個 decorator 的使用,亦即在過程中要執行的指令,後面的數字是執行比例(這裡是 index 和 about 任務是 1:2 比例執行,GET /about 比例會是 /index 兩倍),若都沒有寫,則預設為 1:1。
然後是 WebsiteUser 我們定義了 task_set 讓 Locust 知道當產生 User 實例時要執行的任務。min_wait 則定義 max_wait 測試過程中兩次任務的間隔為 5-15 秒的隨機數。
若是熟悉 Python 讀者可以發現事實上,locust 是使用 Python requests 套件來處理網路請求,所以若是 requests 支援的方法幾乎都可以使用。
使用 GUI 操作
撰寫完 Locustfile 後終於可以正式開始使用 Locust 啦!-H 為要測試的 service host name
使用上也很簡單,只要輸入以下指令,就可以在瀏覽器打開:http://127.0.0.1:8089 進行操作!
1 | $ locust -f locustfile.py -H https://www.example.com |
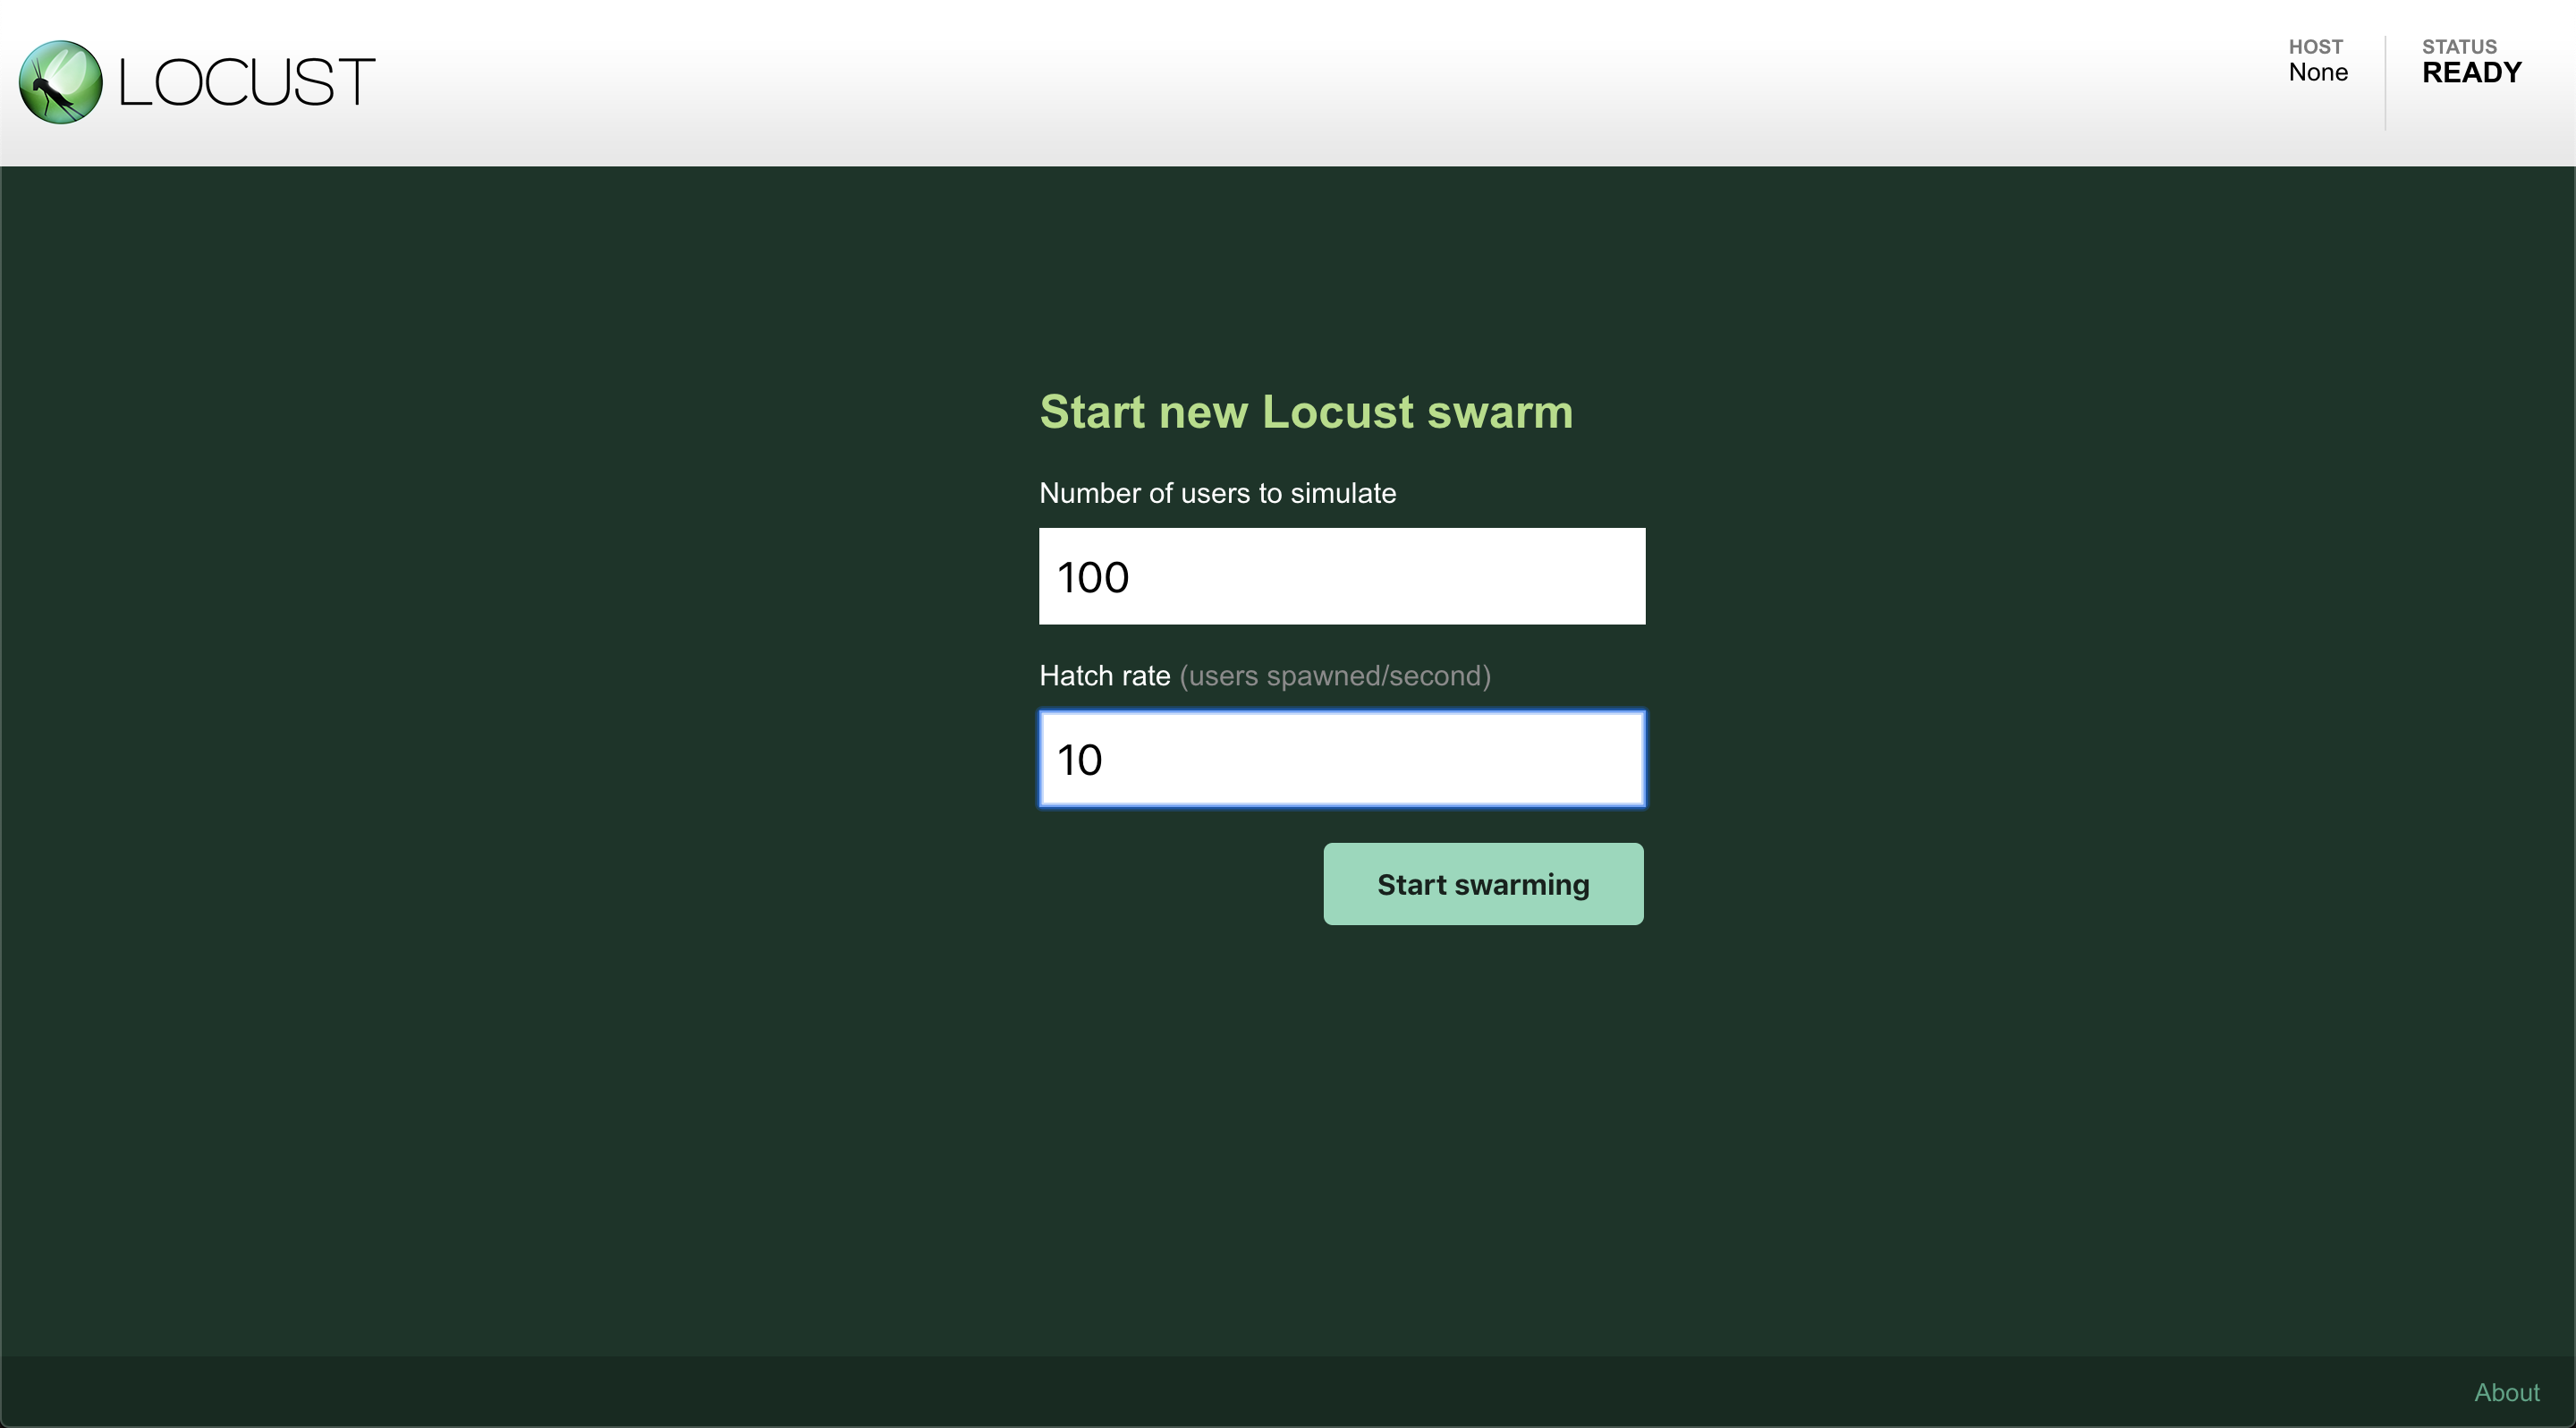
可以輸入希望模擬的使用者數量和多少秒達到預期使用者數量(hatch rate),若是設定 100 個 user,hatch rate 為 10,就代表有 10 秒時間可以 warm up 到 100 使用者。
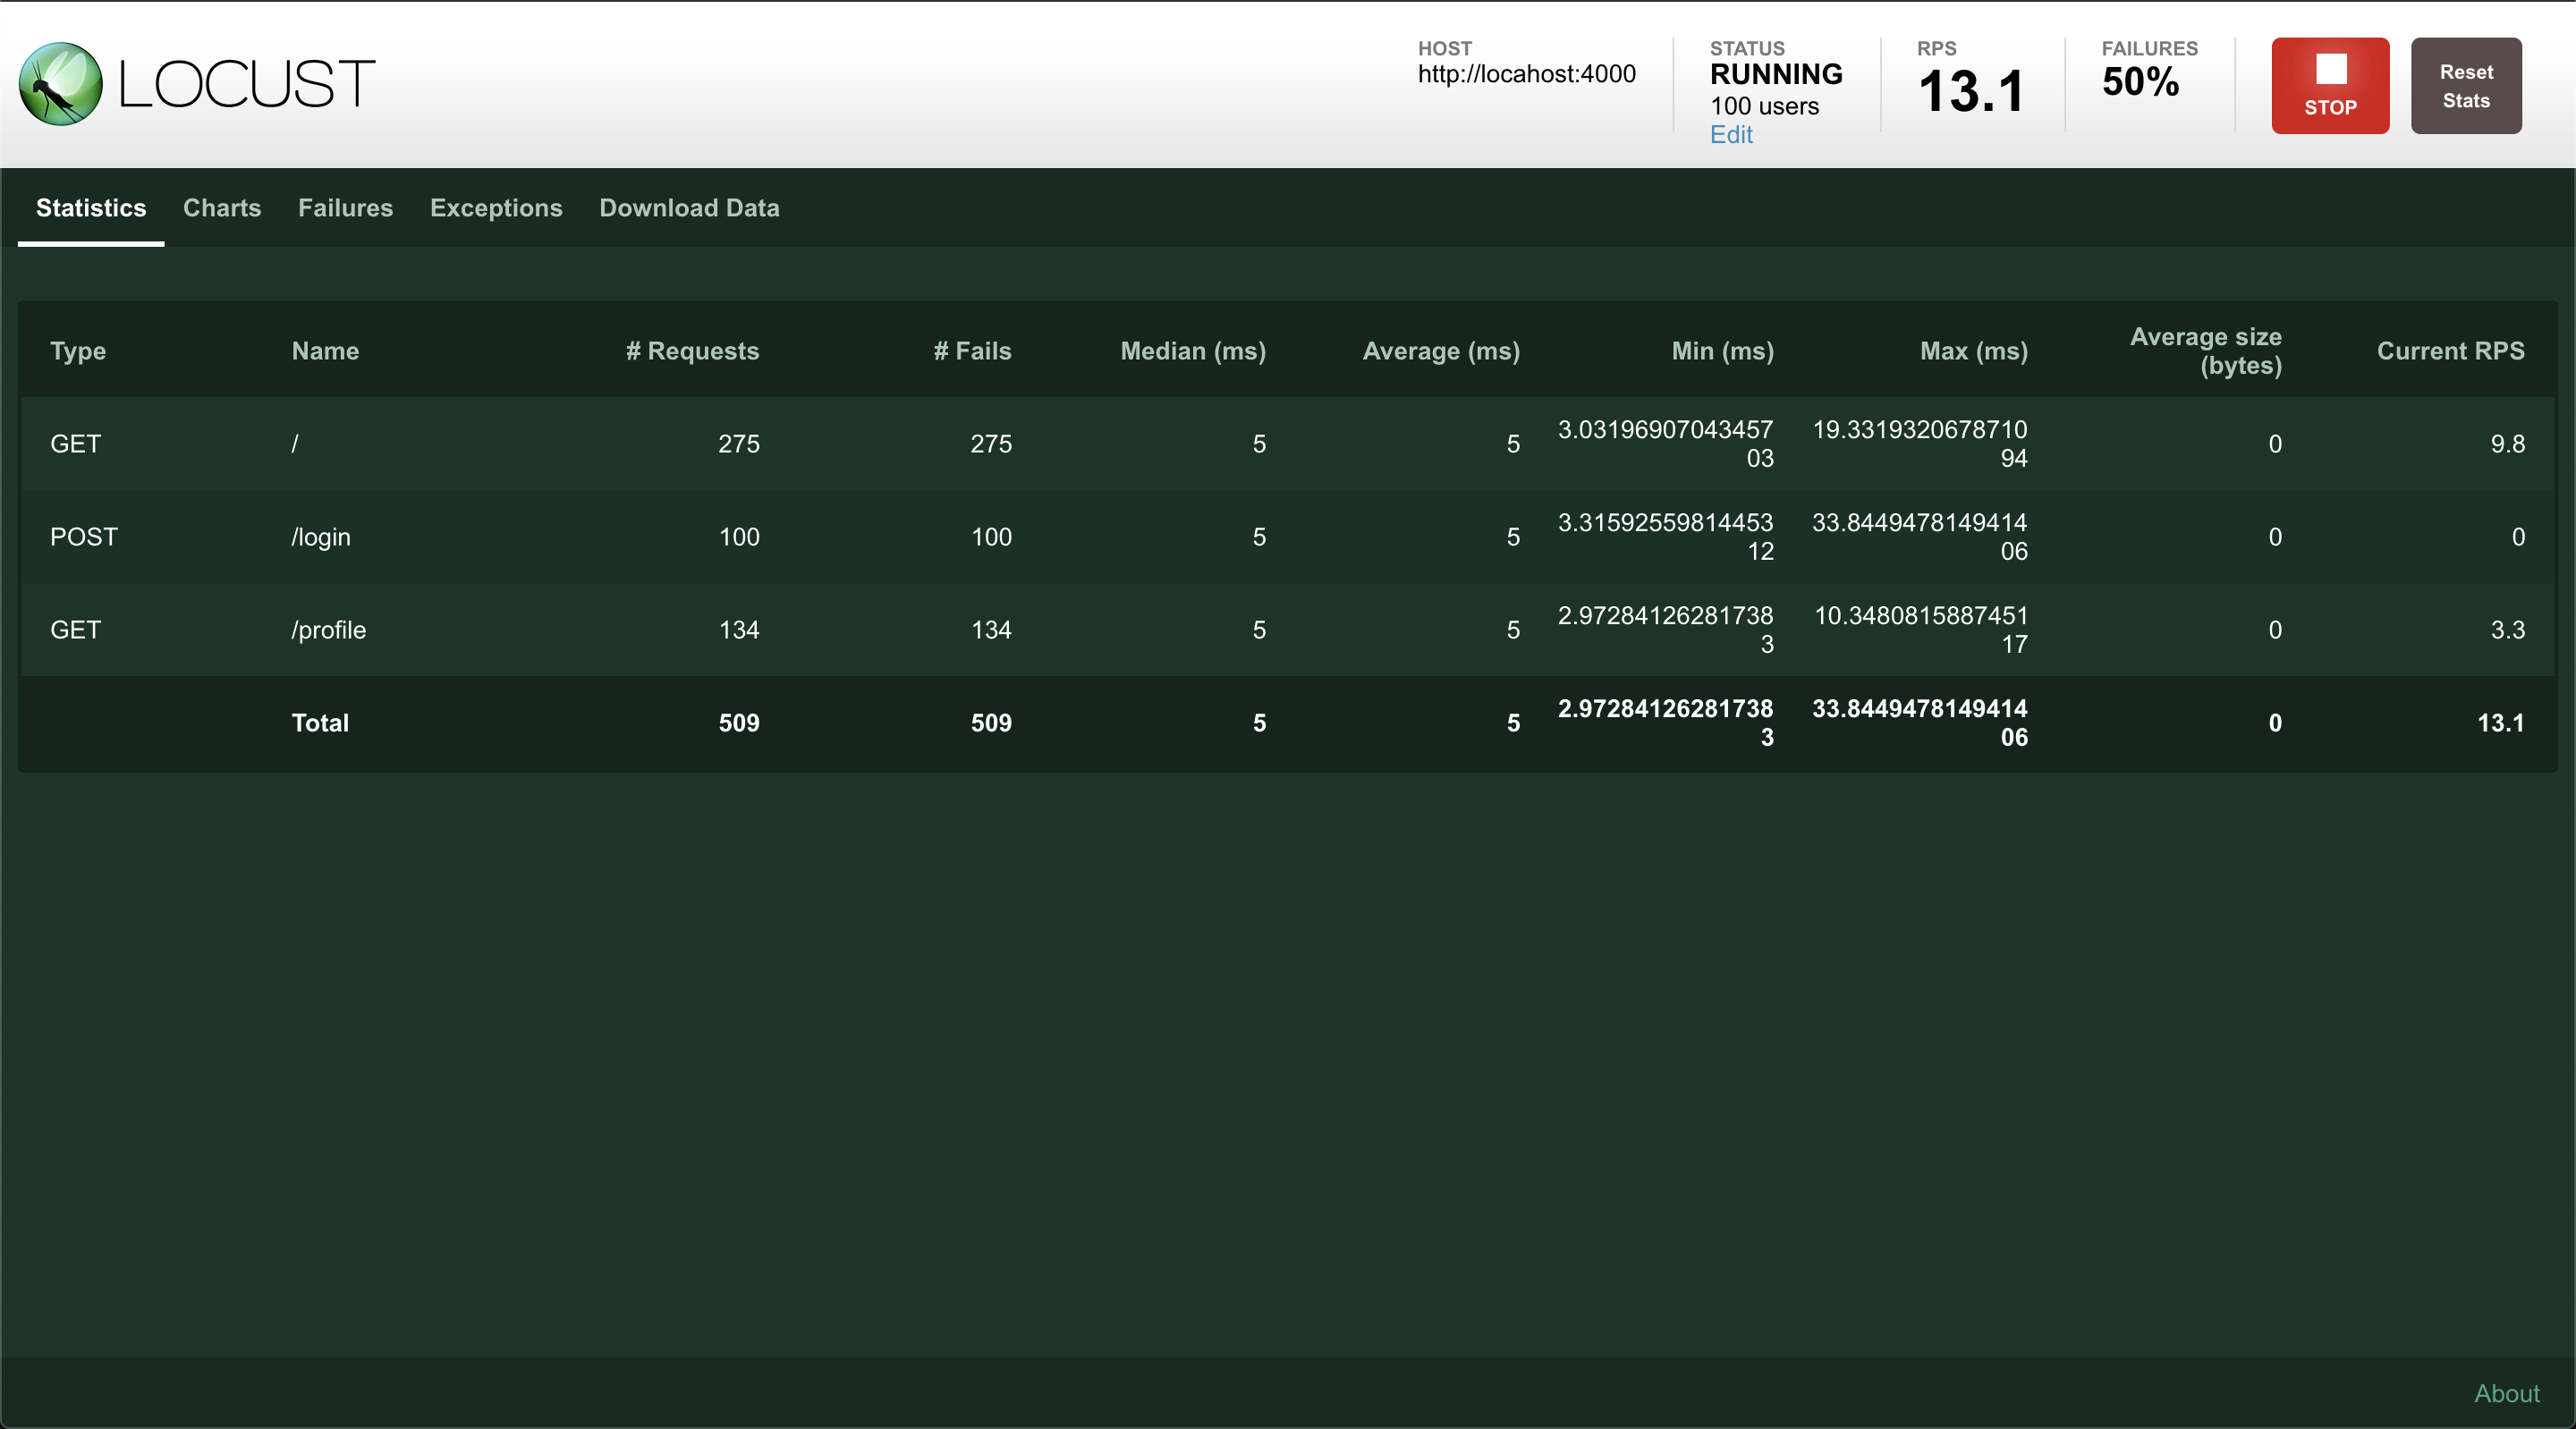
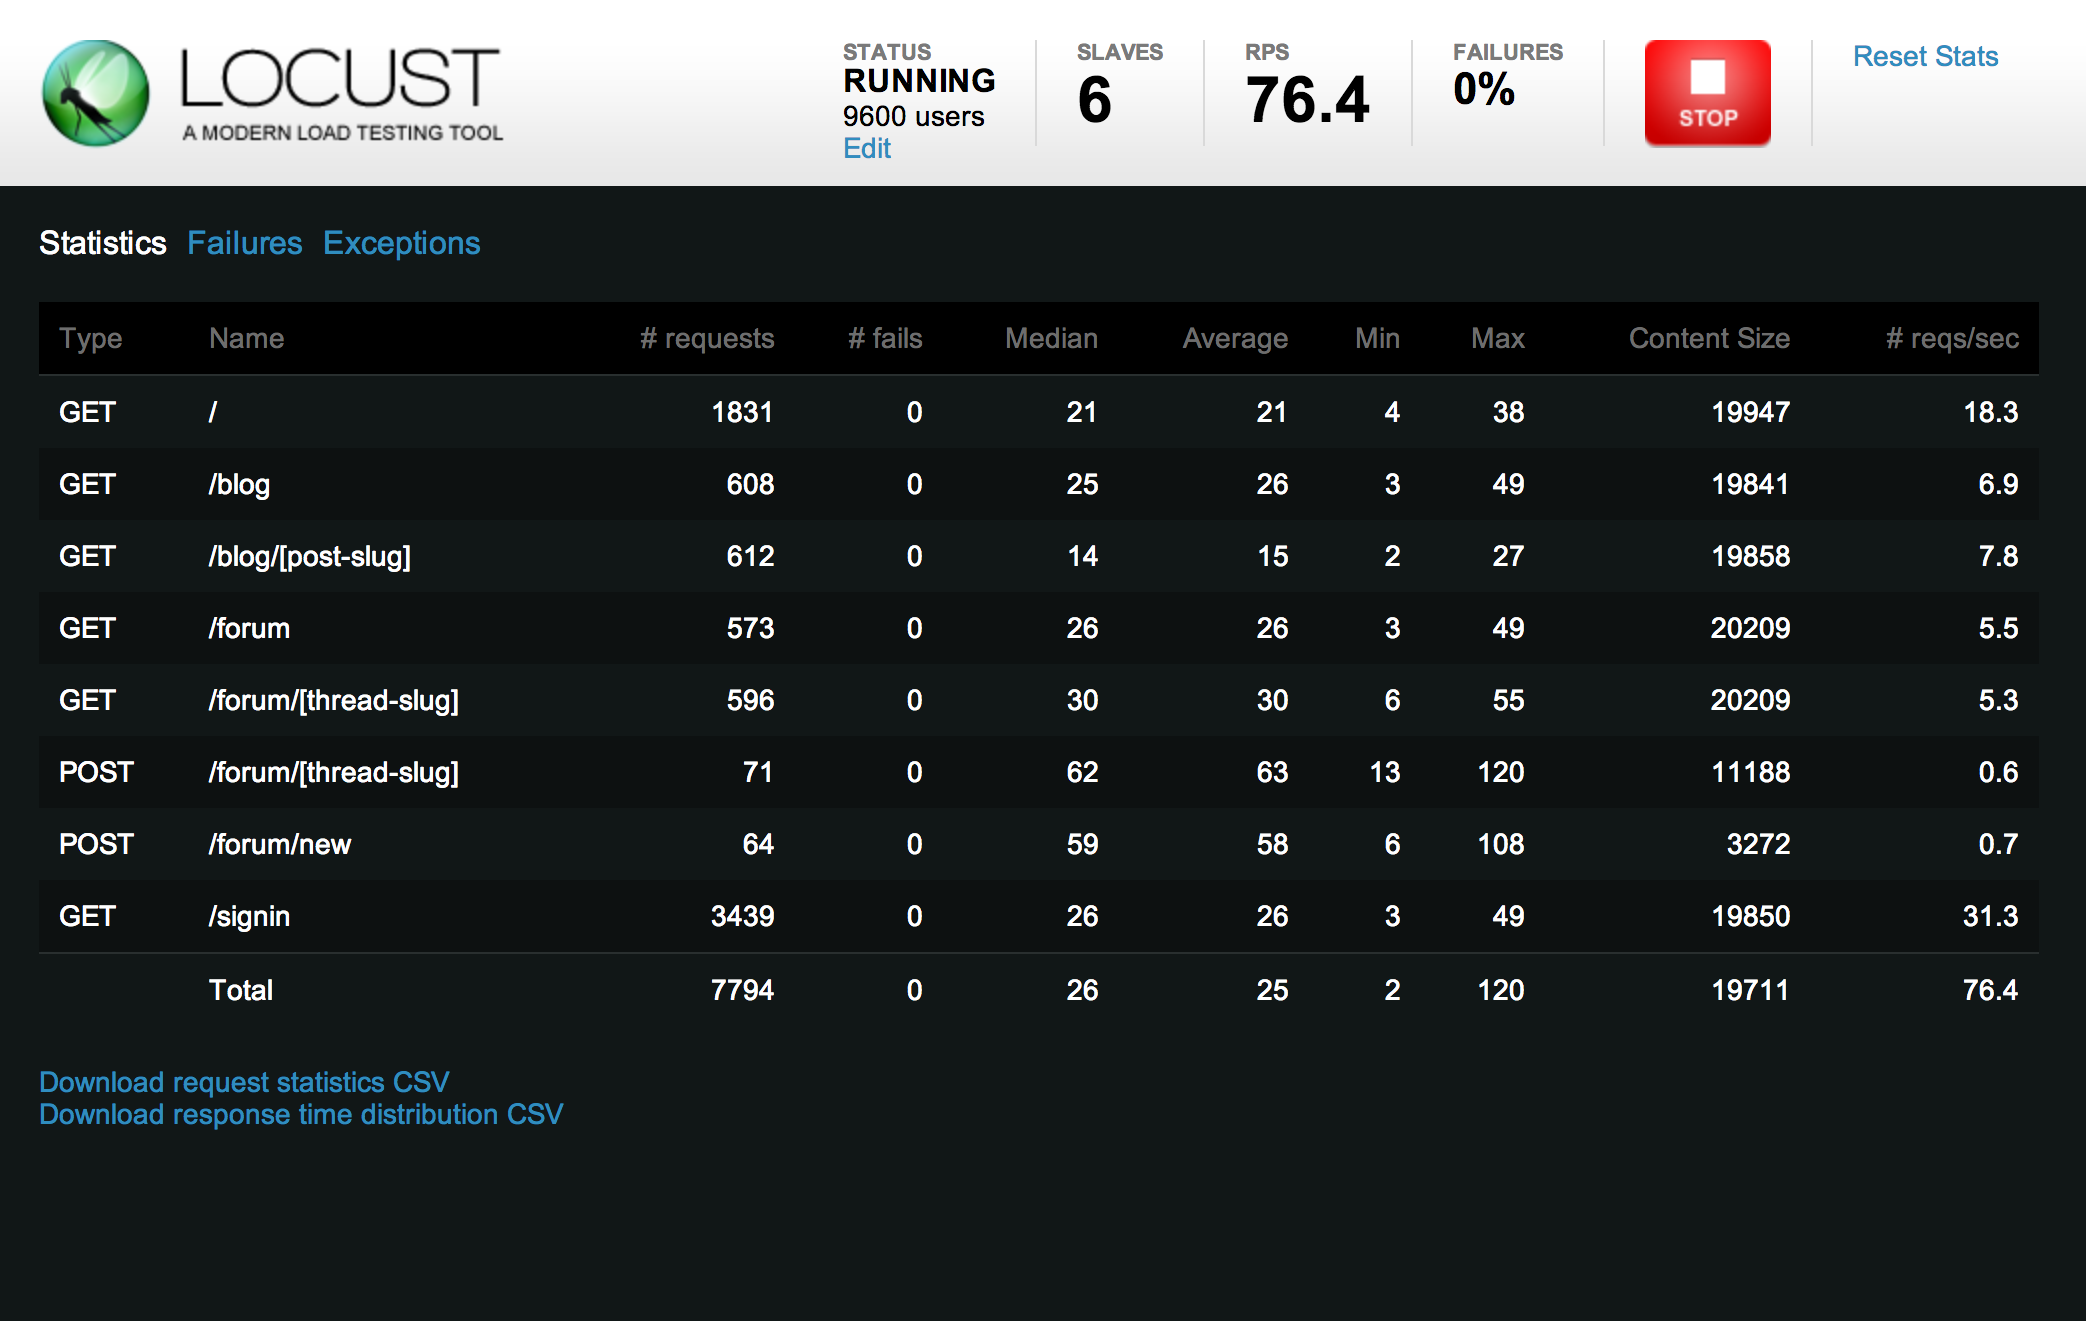
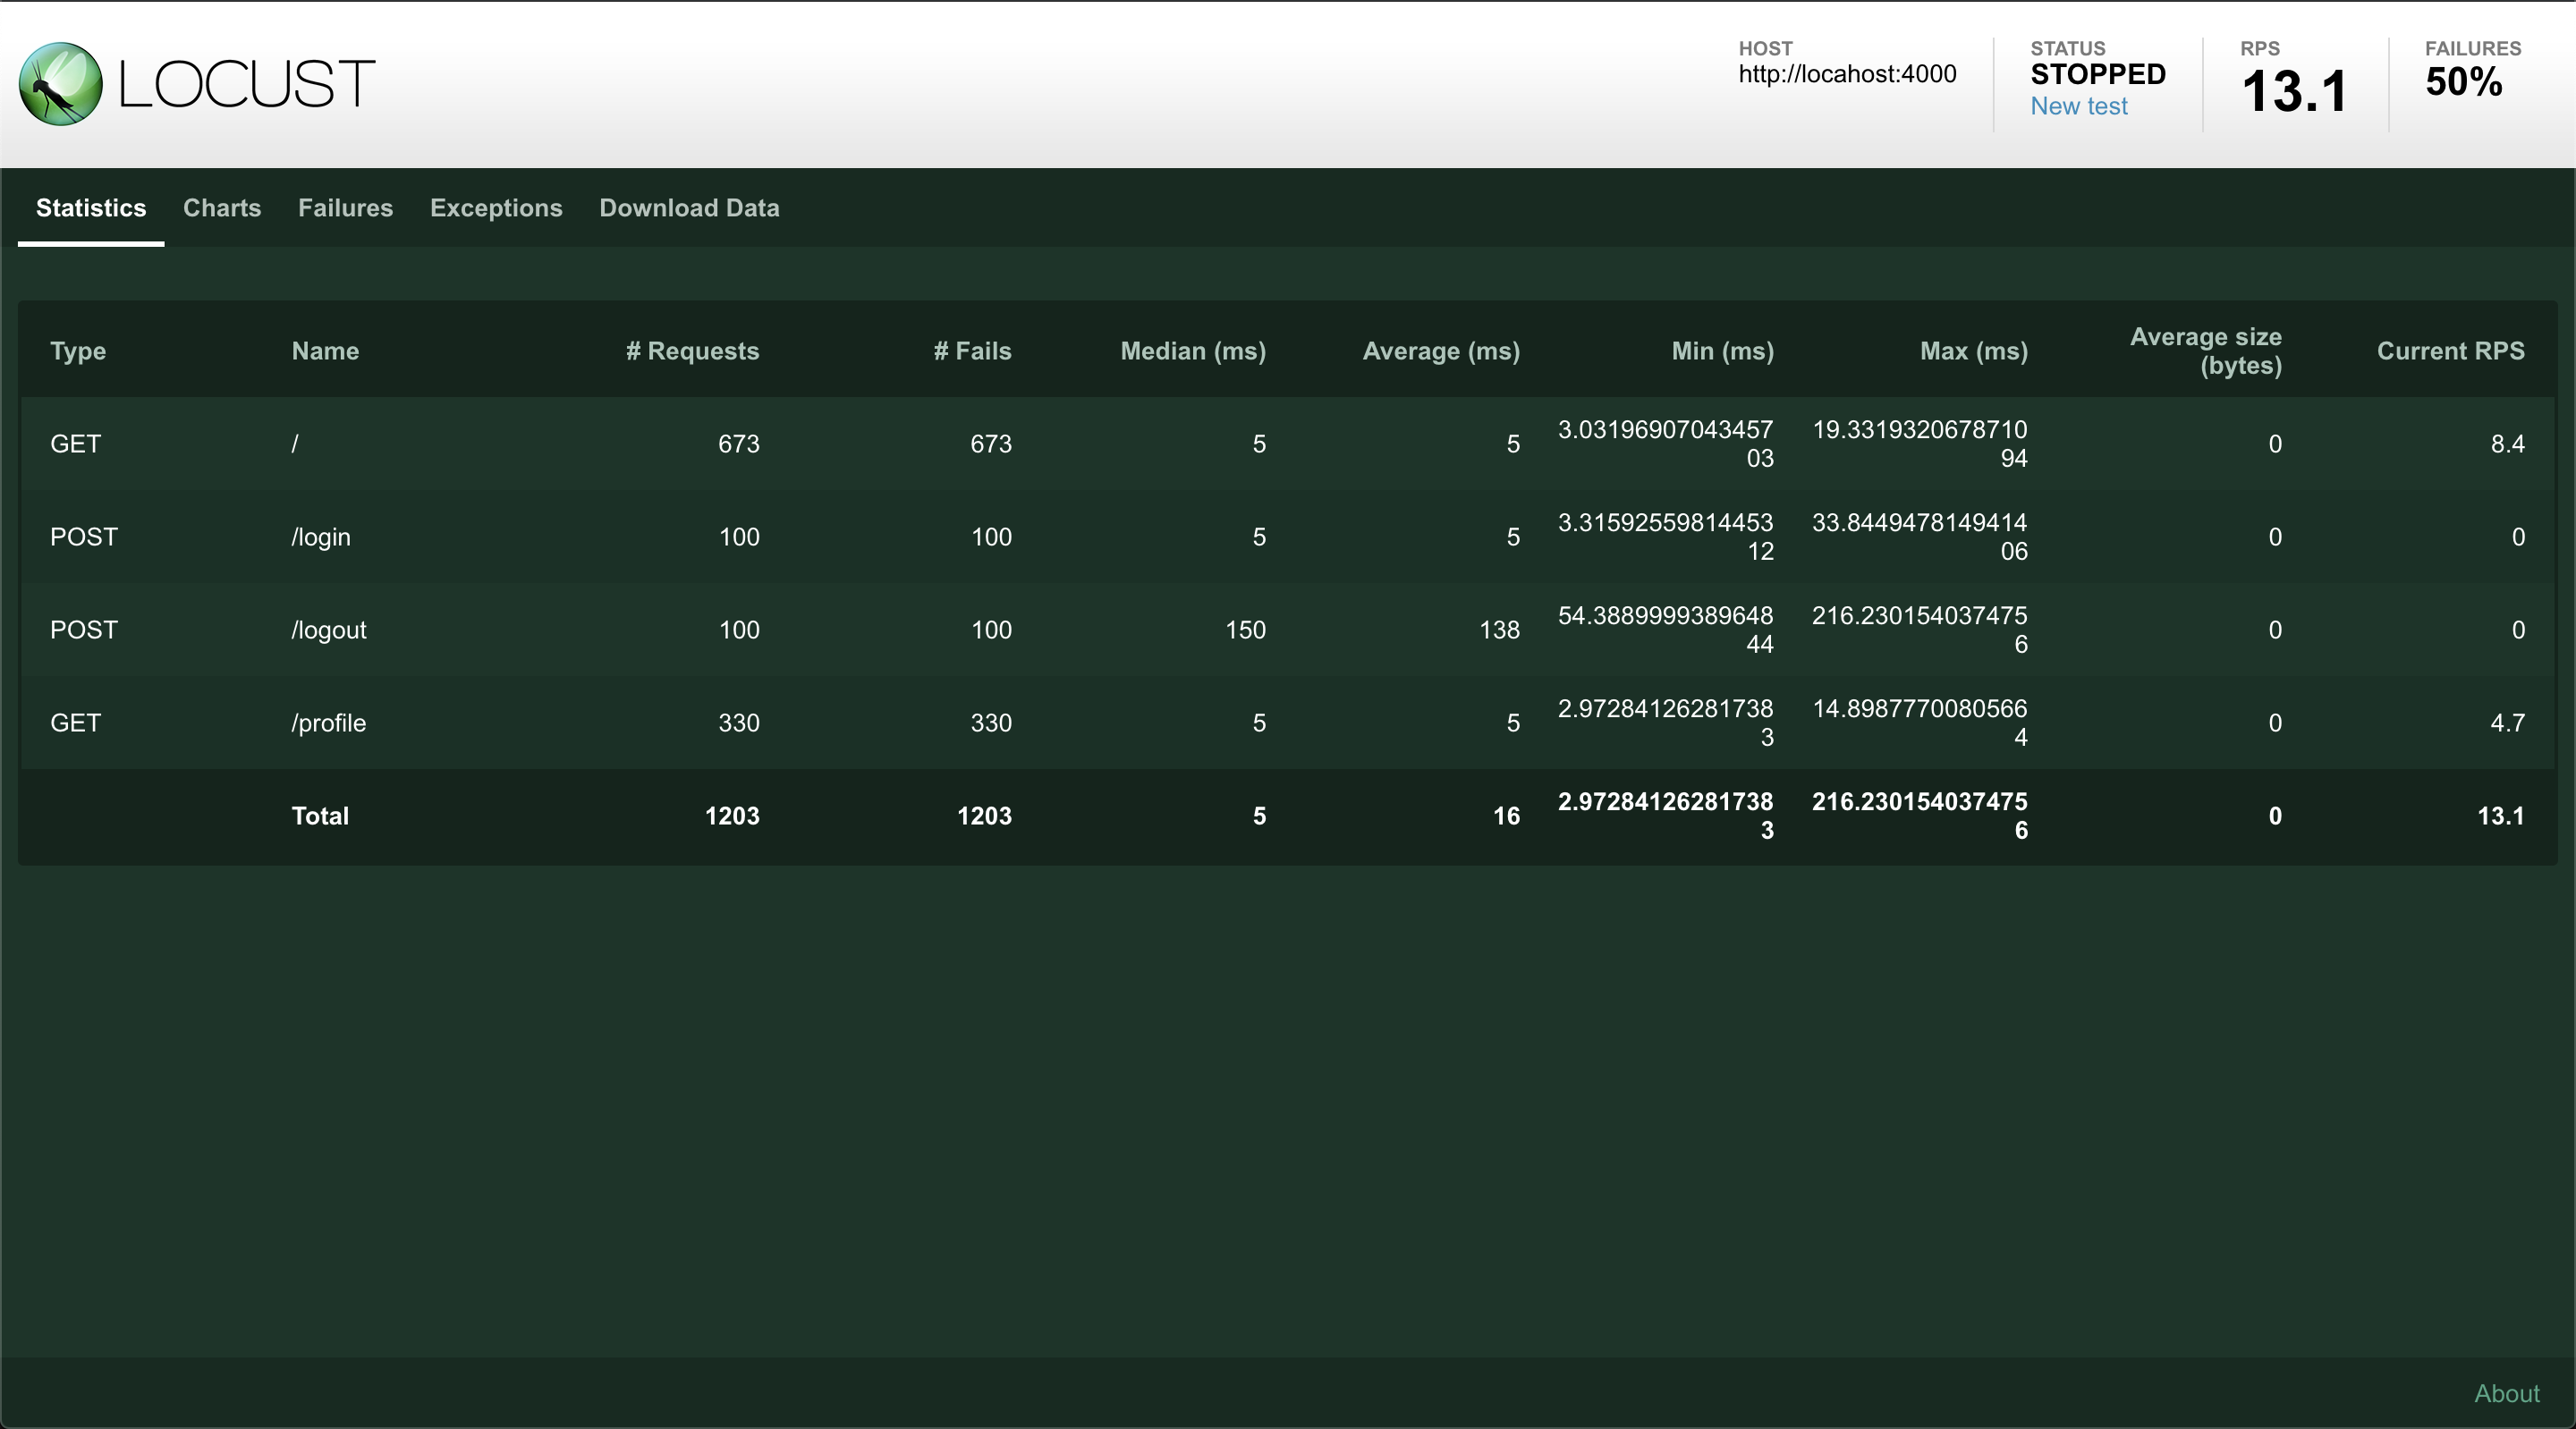
開始執行後可以看到相關的即時數據!
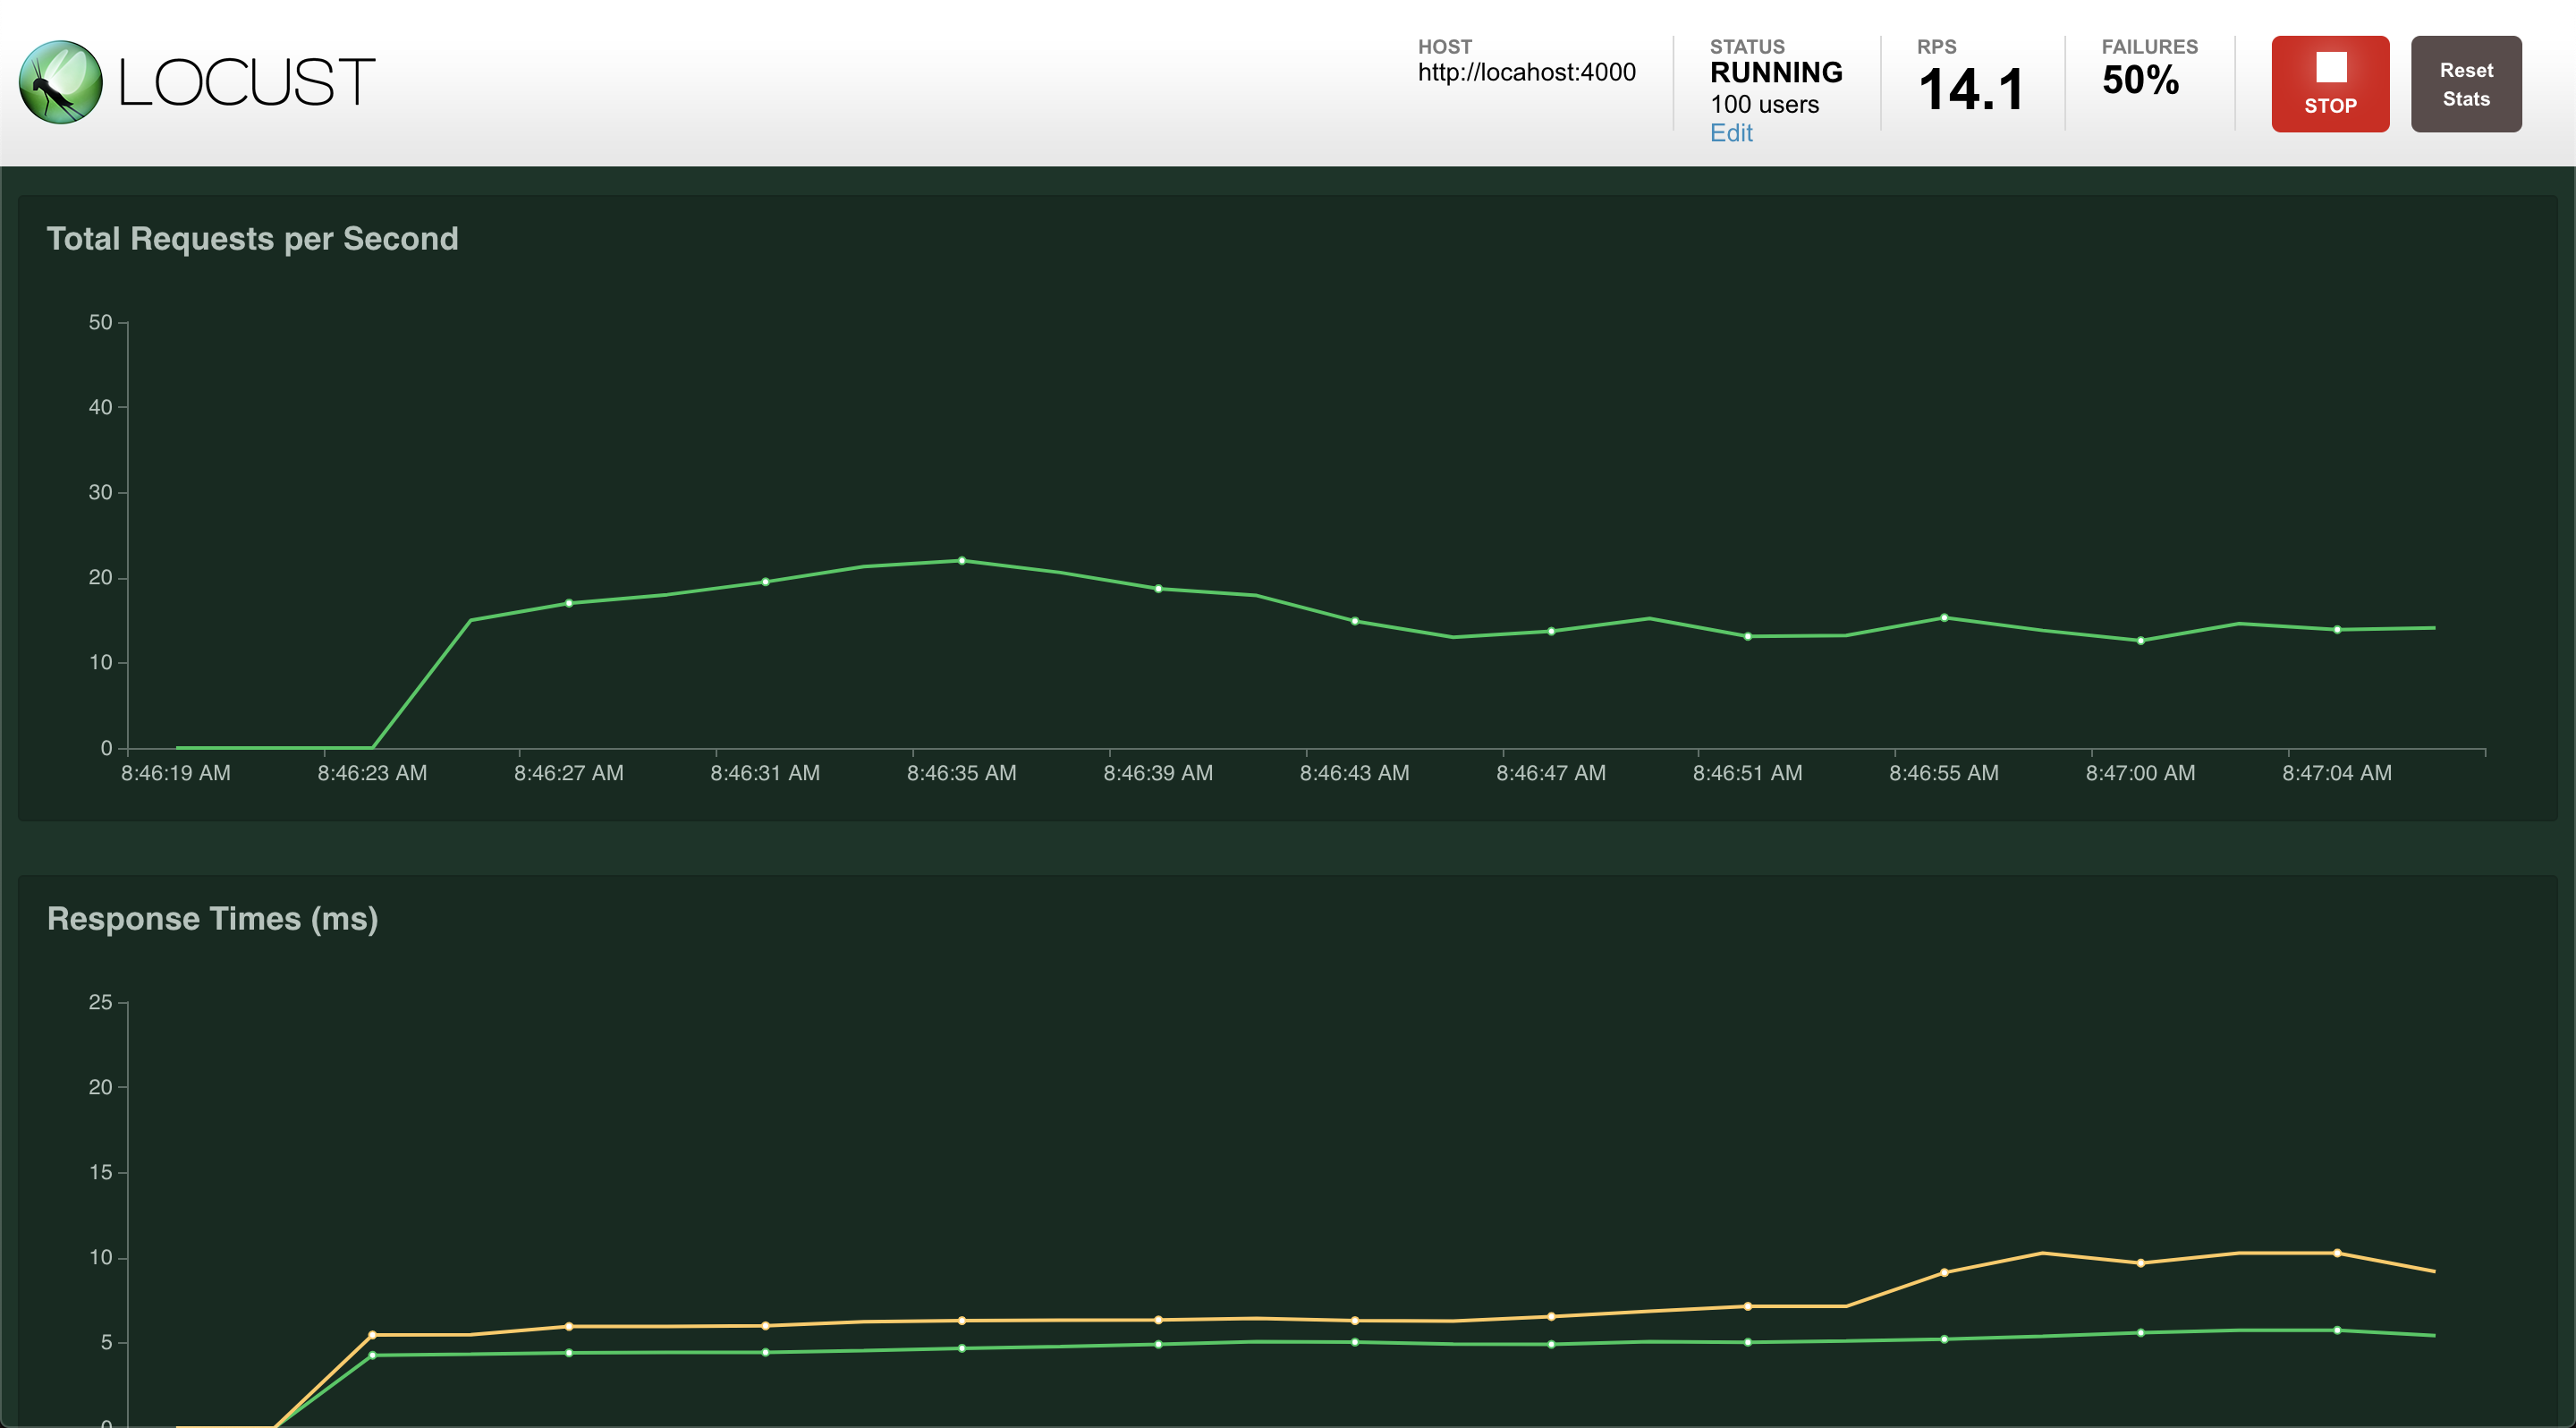
顯示 RPS 和 Response Time 的數據圖表。
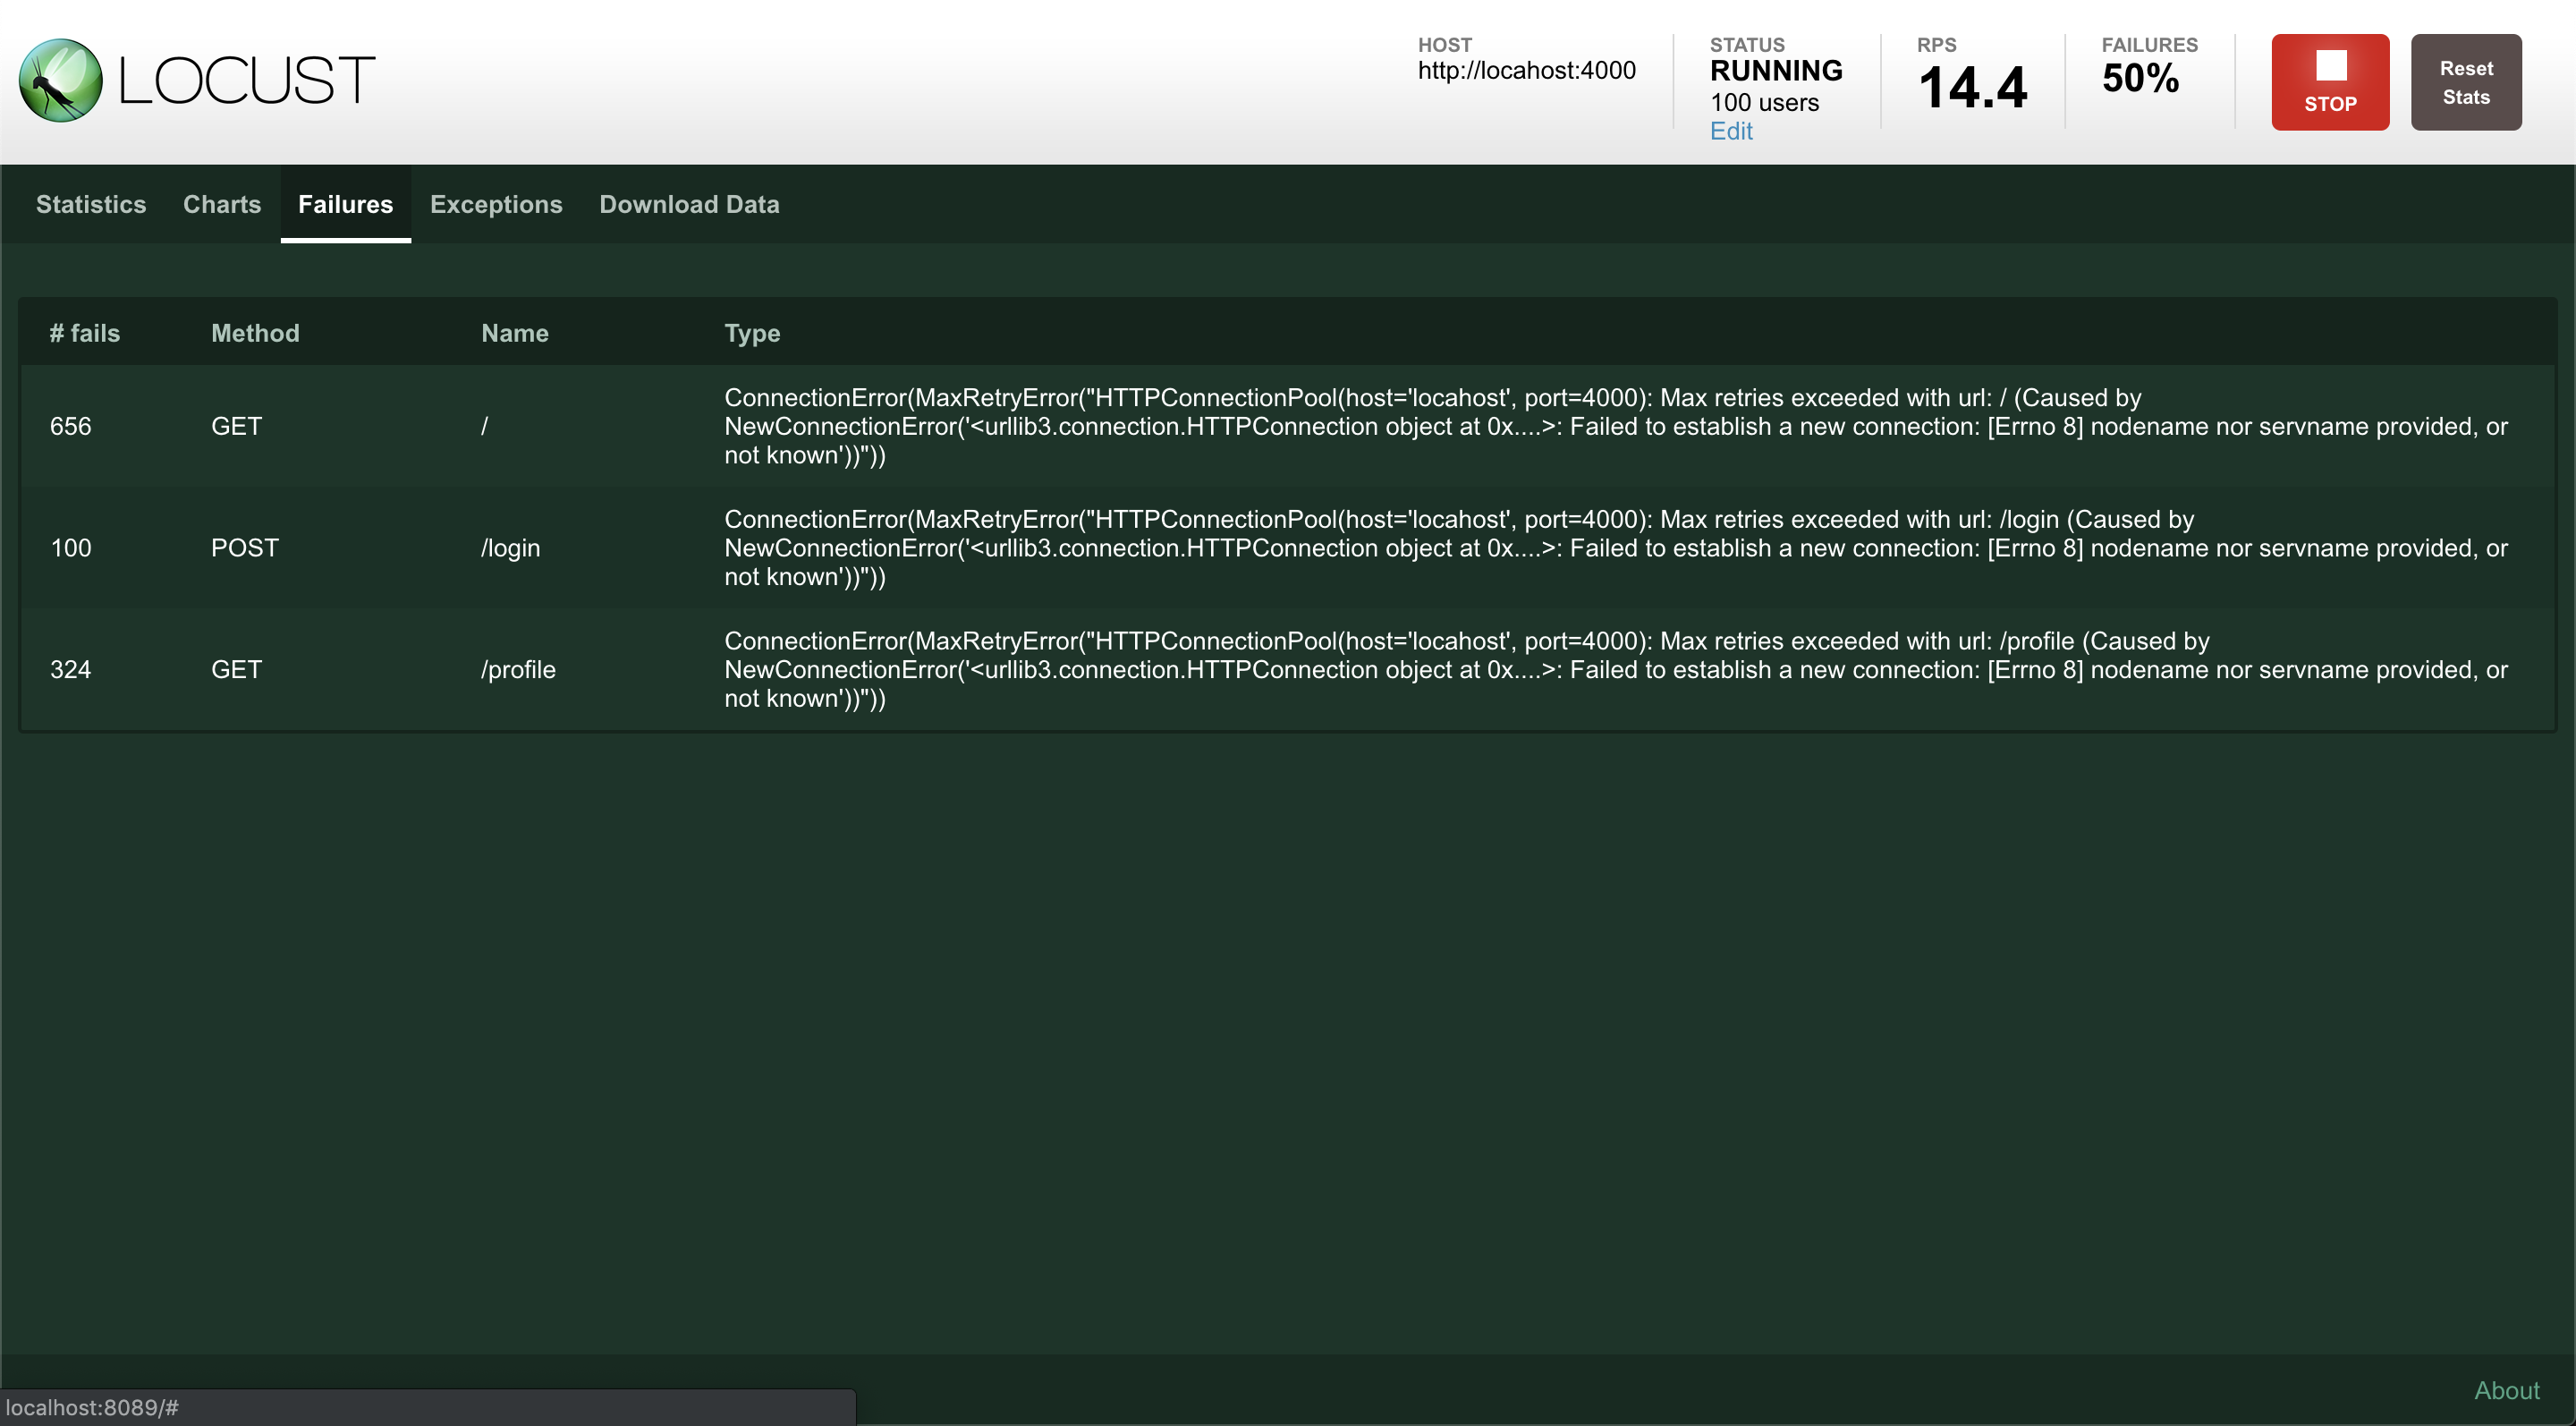
若是有 Failure 產生就會顯示在這頁。
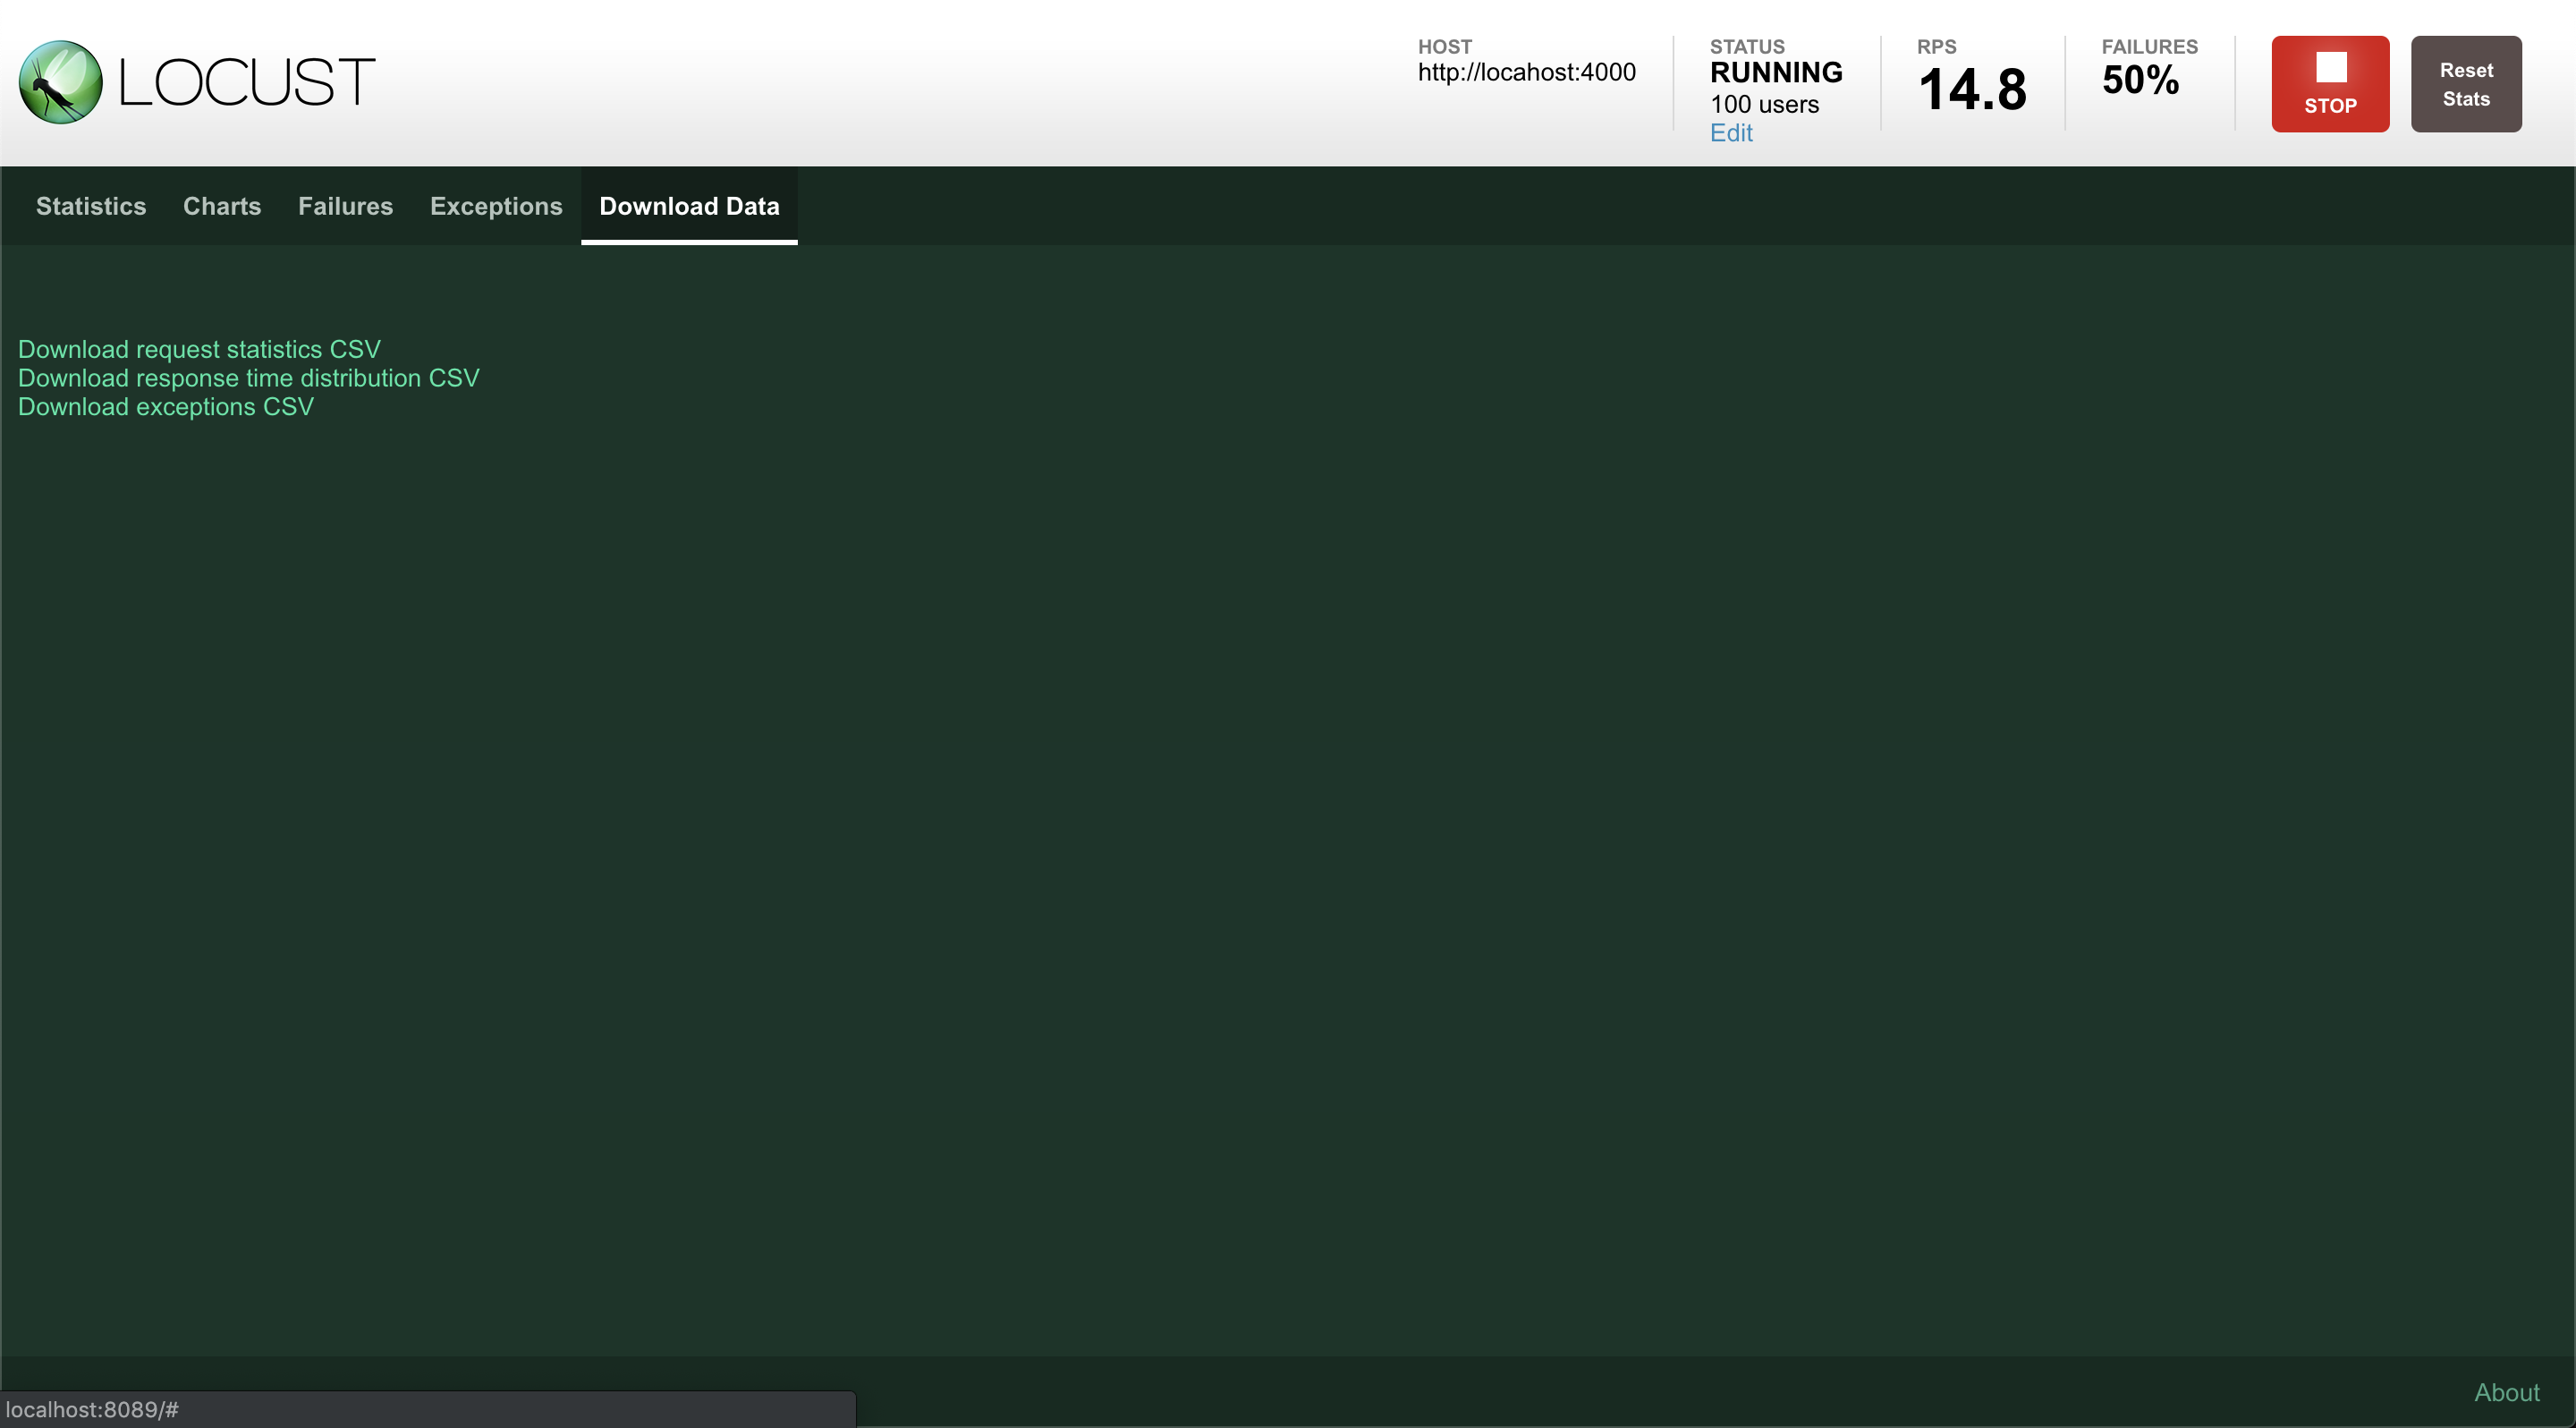
若是希望結束測試可以點選右上角的 stop 還可以到 download data 頁面下載測試的統計資料 csv 檔案。
使用 Terminal 進行操作
若你不想使用圖形化介面你可以直接在指令中加上 –no-web,並設定模擬 user 數量(-c)和 hatch rate(-r)以及執行時間(-t),以下為 100 user,hatch rate:10,執行 10 分鐘的測試:
1 | $ locust -f locustfile.py -H https://www.example.com --no-web -c 100 -r 10 -t 600s |
達到設定執行時間後就會自己結束測試,顯示相關數據於 terminal 中:
1 | Name # reqs # fails Avg Min Max | Median req/s |
使用分散式模式(Distributed)
有時候我們本機的資源不夠會導致在進行 load testing 時希望支援的使用者和 RPS 的數量會不如預期,此時就可以嘗試使用分散式 mode,可以先在一個 termianl 去定義 master 的設定並啟動,然後在 terminal 新開 tab 去把 slave 加入,當 master 監聽 slave 數量達到宣告(–expect-slaves)的時候就會開始執行任務(若沒有則會一直等待)。
宣告 master 指令:
1 | $ locust -H https://www.example.com -f locustfile.py --master --expect-slaves=3 |
開啟另外 termianl tab 執行 slave 指令:
1 | $ locust -H https://www.example.com -f locustfile.py --slave |
總結
以上簡單介紹如何使用 Python 和 Locust 進行 Load testing。Locust 好處在於簡單容易使用,並可以使用 Python 撰寫相關測試,而不用操作複雜的 UI 或是 XML 檔案。而在 Locust 中會提供 RPS 和 Response time 和 Error rate 等統計數據和圖表可以參考,雖然簡單但也算蠻夠使用。若是有更高的效能需求可以參考用 golang 寫的兄弟專案 boomer。關於 Python Locust 這個方便的 Load testing 工具就介紹到這裡,我們下回見囉!
參考文件
- How to Use JMeter for Performance & Load Testing
- Running Locust distributed
- TPS、QPS、RPS
- 深入浅出开源性能测试工具 Locust(使用篇)
(image via locust)
關於作者:
@kdchang 文藝型開發者,夢想是做出人們想用的產品和辦一所心目中理想的學校。A Starter & Maker. JavaScript, Python & Arduino/Android lover.:)
留言討論